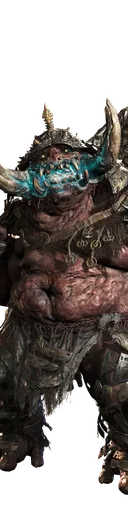
Daidara大唾拉
An endlessly greedy Genma that defiled Kiyomizu-dera Temple with corrupting clouds of Malice. Though it may talk as if all it cares about is food, underestimate its appetite for combat at your peril. Its sheer physical size makes it extremely dangerous up close, and if you are unable to deal with the blunt force trauma it dishes out in spades, you'll soon find yourself struggling. However, it's far from a fast mover, so with a little focus, you should be able to catch most of its blows on your blade.
Every move in this enemy's own action set, with the answer the game defines for it. A move that can be parried opens a window on the frame given; one that can only be blocked does not.
| Move | Kind | Player answer |
|---|---|---|
| Single attack | Attack | Parry or block from frames 54, 57, 63, 72, 82, 90, 94, 104, 132, 142, 174, 177, 180, 197, 225, 241, 283, 305, 347, 366, 415, 457 and 534 |
| Attack rush 2 | Attack | Parry or block from frames 0, 104 and 120 |
| Attack continue rush | Attack | Parry or block from frames 0 and 120 |
| Two-part attack | Attack | Parry or block from frame 94 |
| Jump attack consume sokushinbutsu | Attack | Parry or block from frame 29 |
| Special attack one-handed player stick slam | Attack | |
| Jump attack | Attack | Parry or block from frame 29 |
| Special attack one-handed | Attack | Parry or block from frame 224 |
| Parry after attack | Attack | Parry or block from frames 55, 61, 67, 73, 74, 80 and 120. Block only, from frame 81 |
| Rush parry after attack | Attack | Parry or block from frames 55, 61, 67, 73, 74, 80 and 120. Block only, from frame 81 |
| Block after attack | Attack | Parry or block from frames 55, 61, 67, 73, 74, 80 and 120. Block only, from frame 81 |
| Grab | Grab |
Health damage, stamina (rikido) damage, guard damage, element, form of the blow and the reaction it forces. Counter issen marks the attacks that open a counter.
| Attacks | Damage | Rikido | Guard | Element | Form | Reaction | Guard reaction | Counter issen | Multi-hit |
|---|---|---|---|---|---|---|---|---|---|
| 6 | 0 | 0 | 0 | Blunt | Small | Small | |||
| 3 | 0 | 0 | 0 | Blunt | Small | Medium | |||
| 2 | 120 | 180 | 700 | Blunt | Medium | Small Heavy | |||
| 2 | 150 | 300 | 1000 | Blunt | Small | Small Heavy | |||
| 2 | 150 | 100 | 50 | Blunt | Small | Medium | |||
| 2 | 250 | 375 | 10000 | Blunt | Small | Large Heavy | |||
| 1 | 100 | 150 | 700 | Blunt | Medium | Small Heavy | |||
| 1 | 200 | 300 | 800 | Blunt | Small | Medium Heavy | |||
| 1 | 70 | 105 | 700 | Slice | Large | Medium | |||
| 1 | 120 | 180 | 800 | Slice | Small | Large Heavy | |||
| 1 | 50 | 270 | 10000 | Blunt | Small | Large | |||
| 1 | 220 | 220 | 10000 | Blunt | Small | Large | |||
| 1 | 150 | 225 | 700 | Blunt | Small | Medium Heavy | |||
| 1 | 240 | 360 | 500 | Blunt | Small | Medium Heavy | |||
| 1 | 90 | 135 | 700 | Blunt | Medium | Medium | |||
| 1 | 270 | 405 | 1200 | Blunt | Small | Large Heavy | |||
| 1 | 100 | 150 | 1000 | Slice | Medium | Medium | |||
| 1 | 80 | 120 | 1000 | Blunt | Small | Large Heavy | |||
| 1 | 110 | 165 | 1000 | Blunt | Small | Large Heavy | |||
| 1 | 100 | 150 | 1000 | Blunt | Small | Medium Heavy | |||
| 1 | 270 | 405 | 10000 | Blunt | Small | Large Heavy | |||
| 1 | 240 | 360 | 1000 | Blunt | Small | Medium Heavy | |||
| 1 | 240 | 480 | 10000 | Blunt | Large | Large | |||
| 1 | 150 | 300 | 50 | Blunt | Large | Medium Heavy | |||
| 1 | 80 | 160 | 1000 | Blunt | Medium | Small Heavy | |||
| 1 | 120 | 240 | 1000 | Blunt | Medium | Small Heavy | |||
| 1 | 0 | 0 | 0 | Slice | Small | Small | |||
| 1 | 40 | 0 | 0 | Slice | Small | Small | |||
| 1 | 180 | 270 | 1000 | Slice | Small | Medium Heavy | |||
| 1 | 210 | 315 | 1000 | Slice | Small | Large Heavy | |||
| 1 | 0 | 0 | 0 | Shot | Small | Small | |||
| 1 | 300 | 600 | 0 | Blunt | Small | Small | |||
| 1 | 800 | 1200 | 0 | Blunt | Large | Small | |||
| 1 | 100 | 100 | 100 | Blunt | Small | Small | |||
| 1 | 100 | 100 | 100 | Pierce | Small | Medium | |||
| 1 | 150 | 100 | 100 | Slice | Small | Medium | |||
| 1 | 200 | 300 | 1200 | Blunt | Small | Medium | |||
| 1 | 90 | 135 | 100 | Blunt | Small | Small | |||
| 1 | 150 | 225 | 1000 | Pierce | Small | Medium Heavy | |||
| 1 | 150 | 225 | 1000 | Blunt | Small | Medium Heavy | |||
| 1 | 200 | 300 | 1200 | Blunt | Small | Medium Heavy | |||
| 1 | 90 | 135 | 300 | Blunt | Small | Medium | |||
| 1 | 0 | 0 | 300 | Blunt | Small | Medium | |||
| 1 | 100 | 100 | 100 | Shot | Small | Small | |||
| 1 | 0 | 0 | 0 | Fire | Blunt | Small | Small |
The game multiplies every enemy's health and attack by a rate that rises at story checkpoints and differs per difficulty. Effective health applies those rates to this enemy's base 6,000.
| Difficulty | Health rate | Effective health | Attack rate |
|---|---|---|---|
| Easy | 0.63× to 1.69× | 3,780 to 10,140 | 0.59× to 1.43× |
| Standard | 0.72× to 1.9× | 4,320 to 11,400 | 0.72× to 1.9× |
| Hard | 1.44× to 3.2× | 8,640 to 19,200 | 1.44× to 3.7× |
Every checkpoint
| From story step | Easy | Standard | Hard | Easy attack | Standard attack | Hard attack |
|---|---|---|---|---|---|---|
| The Ruckus at Rendaino (step 2) | 3,780 | 4,320 | 8,640 | 0.59× | 0.72× | 1.44× |
| The Stage is Set at Kiyomizu (step 5) | 5,220 | 6,000 | 10,320 | 0.81× | 1× | 1.9× |
| The Stage is Set at Kiyomizu (step 60) | 5,220 | 6,000 | 10,320 | 0.81× | 1× | 1.9× |
| The Stage is Set at Kiyomizu (step 95) | 5,220 | 6,000 | 10,320 | 0.81× | 1× | 1.9× |
| The Stage is Set at Kiyomizu (step 120) | 5,220 | 6,000 | 10,320 | 0.81× | 1× | 1.9× |
| The Stage is Set at Kiyomizu (step 130) | 5,220 | 6,000 | 10,320 | 0.81× | 1× | 1.9× |
| Kyoto, Corrupted (step 70) | 5,400 | 6,180 | 10,320 | 0.81× | 1.03× | 2× |
| Careful What You Wish For (step 80) | 5,460 | 6,300 | 10,560 | 0.83× | 1.05× | 2.04× |
| The Curse of Kiyomizu-zaka Slope (step 4) | 5,580 | 6,420 | 10,680 | 0.84× | 1.07× | 2.06× |
| Patching up the Pouch (step 5) | 6,060 | 6,960 | 11,340 | 0.86× | 1.16× | 2.19× |
| Windswept Kennin-ji (step 30) | 6,180 | 7,080 | 11,520 | 0.88× | 1.18× | 2.24× |
| What Lurks in the Shadows (step 50) | 6,240 | 7,200 | 11,760 | 0.9× | 1.2× | 2.27× |
| The Roots of All Evil (step 5) | 6,780 | 7,800 | 12,840 | 1.02× | 1.3× | 2.49× |
| Bloodbath on the Bridge (step 10) | 6,960 | 7,980 | 13,020 | 1.04× | 1.33× | 2.52× |
| Shadows Fall (step 10) | 7,200 | 8,280 | 13,560 | 1.06× | 1.38× | 2.62× |
| A Tempest at the Temple (step 10) | 7,680 | 8,820 | 14,400 | 1.13× | 1.47× | 2.8× |
| To Live is to Suffer (step 10) | 7,920 | 9,120 | 15,000 | 1.18× | 1.52× | 2.91× |
| Okuni's Kabuki Dance (step 10) | 8,100 | 9,300 | 15,240 | 1.2× | 1.55× | 2.95× |
| The Demon on the Mount (step 10) | 8,760 | 10,080 | 16,560 | 1.25× | 1.68× | 3.26× |
| A Haunted Distraction (step 30) | 9,000 | 10,320 | 16,740 | 1.27× | 1.72× | 3.3× |
| Storm Chaser (step 40) | 9,480 | 10,860 | 17,700 | 1.3× | 1.81× | 3.45× |
| In the Light of an Icy Moon (step 10) | 9,720 | 11,160 | 18,000 | 1.33× | 1.86× | 3.54× |
| The Clash at Rendaino (step 10) | 9,900 | 11,400 | 18,900 | 1.4× | 1.9× | 3.65× |
| The Clash at Rendaino (step 20) | 10,140 | 11,400 | 19,200 | 1.43× | 1.9× | 3.7× |
Combat starts
Rikido Break Pl
Dead Pl
Break Issen
Soul Enhanced
Soul Boost
Grab Attack Em
Grab Attack Pl
Flag 00
Flag 01
Flag 02
Flag 04
Flag 14
Flag 15
Flag 16
Flag 17
Flag 18
Flag 05
Flag 06
Flag 07
Flag 08
Flag 09
Flag 10
Flag 11
Flag 12
Flag 13
Dead Em
World View
I can smell the souls in it from here! I bet it
tastes great! I bet you taste great, too!鬼の篭手、鬼の篭手! そこから鬼の力、ビンビン感じるぅ! 篭手もお前も、うんまいだろうなぁ!
Counter Issen Start
Where's my food hiding!?腹減ったぁぁぁ! ご馳走どこだぁチクショオオオ!
清水寺に立ち込める瘴気の 原因である大喰らいの幻魔。 食べることしか考えていない 言動とは裏腹に、並みの幻魔とは 比較にならない強さを誇る。 強靭な肉体による肉弾戦や、 振り回される鈍器をまともに 喰らえばただではすまない。 動きは鈍重なためよく見れば刀で 受けるのも難しくはないだろう。